Category: Your Moving Questions Answered
Streamline Your Travel with Compression Packing Cubes: A Comprehensive Guide
Introduction
Are you tired of struggling with overpacked suitcases, messy travel bags, and limited space? The solution may be simpler than you think: compression packing cubes. These ingenious travel accessories have gained popularity among globetrotters and adventurers for their ability to maximize space, keep items organized, and simplify packing and unpacking. In this blog post, we’ll explore what compression packing cubes are, why you should use them, and which ones stand out as the best choices for your next journey.
What Are Compression Packing Cubes?
Compression packing cubes are ingenious travel organizers designed to help you make the most of your luggage space and simplify the packing process. They are essentially rectangular or cube-shaped containers made of lightweight and durable fabric. These cubes feature a unique two-compartment system, which sets them apart from regular packing cubes:
1. Main Compartment: This is where you place your clothing, shoes, and other travel essentials. The main compartment is typically quite spacious and can accommodate various items, depending on the cube’s size.
2. Compression Compartment: The magic of compression packing cubes happens here. The compression compartment is equipped with a set of compression zippers that run along the sides of the cube. When these zippers are closed, they exert pressure on the contents of the main compartment, effectively squeezing the air out and compressing your belongings.
How Do Compression Packing Cubes Work?
Compression packing cubes operate on a simple yet highly effective principle: air removal. Here’s how they work step by step:
Step 1: Packing: Start by placing your folded or rolled clothing and other items into the main compartment of the cube. You can organize your belongings by type, outfit, or any other method that suits your needs.
Step 2: Compress: After packing the main compartment, close the compression packing cube’s two-way zipper. As you do this, the compression zippers in the compression compartment are pulled, which creates tension along the sides of the cube.
Step 3: Air Removal: As the zippers move, they push the air out of the main compartment, gradually compressing your clothing and other contents. The more you pull the compression zippers, the tighter the compression, and the flatter and more compact your belongings become.
Step 4: Seal and Secure: Once your items are compressed to your satisfaction, simply seal the zippers to secure the compression. Your clothes and belongings are now tightly packed and ready for placement in your suitcase or travel bag.
Key Features of Compression Packing Cubes:
- Zippered Closure: Compression packing cubes typically have a two-way zipper closure, allowing you to easily access your belongings and control the compression level.
- Compressible Second Compartment: The magic happens in the second compartment. It features compression zippers that, when closed, reduce the volume of your clothes, effectively saving space in your luggage.
- Various Sizes: Compression packing cubes come in different sizes to accommodate various items like clothing, shoes, toiletries, and accessories. This ensures that you can neatly organize all your travel essentials.
Why Should You Use Compression Packing Cubes?
- Maximizes Luggage Space: Compression packing cubes help you make the most of your suitcase or backpack space by compressing your clothes, making them flatter and more compact.
- Keeps You Organized: These cubes are a game-changer when it comes to keeping your belongings organized. You can easily separate your clothing, shoes, and accessories, reducing the risk of wrinkling or damage during travel.
- Reduces Wrinkling: By keeping clothes neatly folded and compressed, you’ll find fewer wrinkles when you unpack at your destination.
- Simplifies Packing and Unpacking: When you arrive at your destination, unpacking is a breeze. Simply unzip the cubes and place them in your hotel dresser or closet. No need to rummage through your entire suitcase.
- Ideal for Multiple Stops: If you’re on a multi-destination trip, compression cubes make repacking easier and more efficient. You can quickly access specific items without disrupting your entire suitcase.
Top Picks for Compression Packing Cubes
- Eagle Creek Pack-It Specter Compression Cube Set: Known for their quality, Eagle Creek offers durable, lightweight cubes that efficiently compress your clothes.
TravelWise Packing Cube System: This budget-friendly option provides various cube sizes and colors for easy organization and identification.
eBags Hyper-Lite Packing Cube Set: These cubes are designed to be ultra-lightweight while still offering excellent compression capabilities.
AlamedaPacking Cube Set: This compression packing cube set offers space-saving benefits with its double zippers, durability due to lightweight rip-stop nylon, and excellent organization for travel. It also provides water resistance, making it a must-have travel accessory with a lifetime warranty.
Osprey Ultralight Packing Cube Set: Osprey’s cubes are designed with a focus on durability and are available in various sizes to suit your needs.
Conclusion
Compression packing cubes are a must-have travel accessory that can transform your packing and unpacking experience. By maximizing space, keeping your belongings organized, and reducing wrinkles, these cubes simplify the travel process. When choosing the best compression packing cubes for your needs, consider your travel style, luggage size, and personal preferences. With the right cubes in your suitcase, you’ll embark on your adventures with confidence and ease. Happy travels!

So you are wondering where to recycle electronics in New York. In our fast-paced world, electronic devices have become an integral part of our lives, making communication, work, and leisure easier than ever. However, with technological advancements come inevitable upgrades, leading to the question of what to do with our old electronics. The answer lies in responsible disposal and recycling to minimize the environmental impact. If you’re in New York and wondering where to recycle electronics, you’re in luck. This guide will point you to the right places and resources.
What is Electronic Waste
Electronic waste, commonly known as e-waste, poses a significant environmental challenge in today’s digital age. Fortunately, San Francisco offers numerous options for recycling electronics responsibly. By recycling your unwanted electronic devices, you can help conserve resources, prevent pollution, and contribute to a greener future. In this blog, we will explore various locations and programs in San Francisco where you can recycle your electronics safely and conveniently.
Why Recycle Electronics?
Electronics, such as smartphones, laptops, and TVs, often contain hazardous materials like lead, mercury, and cadmium. If these materials leach into the environment through improper disposal, they can contaminate soil, water, and air, posing serious health risks to humans and wildlife. Recycling electronics not only prevents these toxins from entering the environment but also recovers valuable materials like gold, silver, and copper, reducing the need for new resource extraction.
Where to recycle electronics in New York
City Drop-Off Locations
You can drop off electronics for free at Special Waste Sites or seasonal SAFE Disposal Events. Learn more on the Special Waste Disposal page.
Facilities in NYC
The DSNY website provides a comprehensive map that includes current facilities and links to their respective websites. This includes more than 90 retail outlets and non-profits that accept e-waste for recycling or donation, with each store or chain accepting a variety of electronic products (check before arrival). The following are the most well-known locations in NYC:
Lower East Side Ecology Center
Other Locations
View a map of electronics drop-off locations or contact the following businesses or organizations to drop off, recycle, or donate your electronics.
Please note that some sites charge fees or don’t accept certain items. Check the location’s website or contact them to confirm before you drop off the items.
NewTech Recycling
NewTech Recycling offer comprehensive corporate e-waste recycling solutions to help you dispose of your electronic devices securely. From old computers and laptops to printers, scanners, and other electronic equipment, they have the expertise to handle a wide range of electronic waste items.
Take-Backs
You can return unwanted electronics to manufacturers for recycling or disposal for free. Electronic manufacturers, such as Samsung, Sony, or Toshiba, must accept electronics from residents at no cost.
Cell phones can also be dropped off at any store that sells service plans.
You can find more information about recycling electronics at the store where you purchased the item or at any store that sells the item. You can also call the manufacturer or check your brand’s website.
The NY State Department of Environmental Conservation (NYSDEC) keeps a list of registered electronics manufacturers and information about their e-waste acceptance programs on its website.
Find e-waste acceptance programs.
Mail-Back
Many brands offer free mail-back options. Check the manufacturer’s website or visit the NYS Department of Environmental Conservation (NYSDEC), which has a list of electronic equipment manufacturers registered in New York State. If a manufacturer refuses to recycle your electronics, report the company to NYSDEC online or call 1-800- 847-7332.
All Green Recycling
All Green Electronics Recycling offers local recycling drop off locations nationwide. Their Nationwide network of e-waste recycling centers allow you to find a local solution for electronics recycling, data destruction and on-site hard drive shredding near you. To find Recycling Near Me, navigate through the list to find an e-waste drop-off location near you or request an e-waste recycling pickup.
Need some long distance moving tips? Embarking on a long-distance move is like stepping onto a path of exciting new horizons. Whether you’re relocating for a job opportunity, a change in scenery, or a fresh start, the journey ahead is filled with both anticipation and challenges. As you set out to navigate the miles that lie between your current home and your destination, you’ll need a roadmap of practical strategies and expert insights to make this transition as seamless as possible. In this guide, we’ve compiled a treasure trove of long-distance moving tips to empower you every step of the way.
Long Distance Moving Tips
Create a moving checklist:
Streamline your long-distance move by utilizing an ultimate moving checklist. This comprehensive guide will outline all the necessary steps, from the initial planning phase to settling into your new home. From notifying utilities and updating addresses to packing and scheduling movers, a well-structured checklist ensures you don’t miss any crucial details. Tailor the checklist to your specific needs, and follow it diligently to keep your move organized and stress-free, no matter the distance.
Organize a Successful Garage Sale:
As you prepare for your long-distance move, take advantage of the opportunity to declutter by organizing a garage sale. Sort through your belongings and identify items you no longer need. This not only helps you lighten your load but also offers a chance to earn some extra cash. Advertise your garage sale well in advance, price items reasonably, and create an inviting atmosphere. Not only will you streamline your belongings before the move, but you’ll also contribute to your moving funds and potentially connect with your neighbors one last time before departing.
Create an Inventory List:
As you embark on a long-distance move, crafting a comprehensive inventory list is paramount. Take the time to catalog each item you’ll be moving, room by room. This not only helps you keep track of your belongings but also assists in planning your packing and unpacking processes. Should any items go missing or get damaged during the move, your inventory list will serve as a valuable reference for insurance claims. Stay organized and ensure nothing is left behind by diligently maintaining this detailed record of your possessions.
Gather In-Home Moving Estimates:
When preparing for a long-distance move, obtaining multiple in-home moving estimates is a crucial step. Reach out to reputable moving companies and schedule visits to your current home. This allows them to assess the scope of your move accurately. By comparing these estimates, you can make an informed decision about the best moving company for your needs. Remember, this process not only helps you budget effectively but also ensures that you receive tailored services that suit the specifics of your move.
Long Distance Moving Tips
Hire a reputable moving company:
If you decide to hire a moving company rather than doing the moving yourself be sure to secure the services of a moving company that boasts a strong reputation and unwavering trustworthiness. While cost-effectiveness remains a pivotal factor in this determination, it’s imperative to recognize that the lowest price tag may not necessarily equate to the highest quality service. Shield yourself from potential moving scams, especially when your journey spans thousands of miles.Curious about the criteria for picking the perfect moving company? Check out How To Choose The Right Moving Company
Update Vital Documents:
Amid the hustle of a long-distance relocation, remember to update crucial documents like your driver’s license, vehicle registration, insurance, voter registration, financial accounts, healthcare providers, insurance, tax agencies, subscriptions, memberships, legal documents, and employment records. Ensuring these details are current will pave the way for a seamless and well-prepared transition to your new home.
Invest in Good Packing Supplies:
If you are deciding to pack your belonging yourself, definitely invest is some high quality moving supplies.For a successful long-distance move, investing in the right packing supplies is essential. From sturdy boxes in various sizes to bubble wrap, packing paper, tape, and protective padding, having the proper materials ensures your belongings are well-protected during transit. Don’t cut corners on packaging; fragile items require extra care. By using high-quality packing supplies, you’re safeguarding your possessions and increasing the likelihood of a smooth, damage-free move to your new destination. Visit our store to get Moving Supplies Delivered To Your Door or also check our Amazon Moving Supplies for a great choice.
Label boxes with your full name:
During a long-distance move, it’s common for your boxes to share space with those of other families on the same moving truck. To avoid mix-ups or misplacements, ensure each box bears a clear label with your name. For added security, consider adding your phone number to highly valuable boxes, safeguarding against any unintended detours.
Secure Moving Insurance Coverage:
Before embarking on a long-distance move, don’t forget to prioritize obtaining moving insurance. While professional movers take precautions, unforeseen accidents can occur during transit. Having moving insurance ensures that your belongings are financially protected in case of damage or loss during the journey. Evaluate different insurance options and select coverage that aligns with the value of your possessions and the distance of your move. This added layer of security will grant you peace of mind as you set off on your relocation adventure.
Plan According to Your Delivery Window:
When orchestrating a long-distance move, keep your delivery window in mind. Coordinate your travel plans and arrival at your new destination to align with the estimated delivery time of your belongings. This strategic planning prevents you from waiting excessively for your items to arrive or, conversely, arriving before they do. By syncing your schedule with your delivery window, you can smoothly transition into your new home without unnecessary delays or inconveniences.
Opt for the Off-Season Move:
Consider scheduling your long-distance move during the off-season if possible. Moving companies tend to have more availability and flexibility during non-peak months. This can lead to smoother logistics, better rates, and more personalized attention. By avoiding the busy periods when many people are relocating, you increase your chances of securing your preferred moving dates and enjoying a more relaxed and efficient move.
Pack Boxes with Distance in Mind:
When packing for a long-distance move, keep the journey ahead in consideration. Place heavier items at the bottom of the boxes and lighter ones on top. Fragile items should be carefully wrapped and cushioned with packing materials to withstand the transportation process. Strategically packing your boxes ensures that your belongings are well-protected and that the weight distribution makes lifting and loading easier for both you and the movers.
Prioritize Essential Items:
In the midst of a long-distance move, ensure that you pack a separate bag containing essential items you’ll need immediately upon arrival at your new home. This “survival kit” could include toiletries, a change of clothes, important documents, medications, chargers, and basic tools. By having these necessities easily accessible, you won’t have to sift through boxes to find crucial items during the initial stages of settling into your new space.
Understand Restricted Items:
Before embarking on your long-distance move, familiarize yourself with what items are permissible to transport and which are restricted or prohibited. Different moving companies and transportation regulations may vary, so ensure you know what you can and cannot move. Items such as hazardous materials, perishable goods, and certain valuables might require special handling or may not be allowed altogether. By being aware of these restrictions, you can avoid last-minute surprises and make appropriate arrangements for any restricted items.
Conclusion:
We hope you found these long distance moving tips helpful. As the wheels of change keep turning and your journey toward a new chapter unfolds, remember that a long-distance move is not merely about changing your address. It’s about embracing the unknown, discovering the beauty of unfamiliar landscapes, and weaving new stories into the fabric of your life. By planning meticulously, packing thoughtfully, and maintaining a positive outlook, you’ll not only conquer the distance but also embark on an adventure of a lifetime. As you step across the threshold of your new home, take a deep breath and relish the moment – you’ve mastered this long-distance move with confidence and grace. Welcome home.
Who Regulates Moving Companies in Houston?
Introduction
Moving to a new home or office is an exciting yet daunting task. Whether you’re changing neighborhoods or crossing state lines, hiring a reputable moving company can significantly ease the process. But, how do you ensure that the moving company you choose is reliable and trustworthy? In Houston, like in many other places, there are regulatory bodies in place to protect consumers and maintain industry standards. In this blog post, we will explore who regulates moving companies in Houston and how these regulations benefit you, the consumer.
The Texas Department of Motor Vehicles (TxDMV)
In the state of Texas, including Houston, the primary regulatory authority overseeing the moving industry is the Texas Department of Motor Vehicles (TxDMV). The TxDMV enforces rules and regulations governing moving companies to ensure that they operate ethically and provide quality services.
Before you hire a mover, first check with TxDMVs Truck Stop, the database that can tell you whether a company is licensed with the TxDMV. A licensed Texas mover will have an “Active” TxDMV certificate number on file.
What the TxDMV Covers
- Licensing: All moving companies that operate within Texas, including Houston, are required to obtain a license from the TxDMV. This license signifies that the company has met certain criteria and is authorized to provide moving services in the state.
- Insurance Requirements: To protect consumers, moving companies are required to carry specific levels of insurance. This insurance ensures that your belongings are covered in case of damage or loss during the move.
- Transparent Pricing: The TxDMV mandates that moving companies provide clear and accurate pricing information to their customers. This helps prevent hidden fees and unexpected costs.
- Dispute Resolution: In the event of a dispute between you and your chosen moving company, the TxDMV provides a platform for resolution. This process helps ensure that consumers’ rights are protected.
Also be sure to check out
Better Business Bureau (BBB)
While the TxDMV primarily focuses on regulatory aspects, the Better Business Bureau (BBB) serves as a valuable resource for consumers seeking reputable moving companies in Houston. The BBB is a non-profit organization that collects and reviews consumer complaints and reviews about businesses, including moving companies. Their accreditation and rating system offer valuable insights into a company’s reputation and customer satisfaction.
When choosing a moving company in Houston, consider looking for BBB-accredited businesses with high ratings and positive reviews. This can help you make an informed decision and avoid potential scams or unprofessional movers.
Federal Motor Carrier Safety Administration (FMCSA)
If your move involves crossing state lines, you should also be aware of the Federal Motor Carrier Safety Administration (FMCSA). This federal agency regulates interstate moving companies, ensuring they adhere to safety and quality standards. Movers conducting interstate moves must be registered with the FMCSA and possess a unique USDOT number. You can verify a moving company’s compliance with FMCSA regulations on their website, providing an extra layer of assurance for your long-distance move.
Conclusion
Moving can be a stressful experience, but with the right moving company, the process becomes much smoother. Knowing who regulates moving companies in Houston is essential for your peace of mind. The Texas Department of Motor Vehicles, Better Business Bureau, and Federal Motor Carrier Safety Administration all play crucial roles in maintaining industry standards and protecting consumers.
Before choosing a moving company, do your research, check their licensing and accreditation, read reviews, and ensure they meet all regulatory requirements. By taking these steps, you can confidently hire a moving company in Houston that will safely and efficiently transport your belongings to your new home or office.
Suggested posts for you
How to fill nail holes in wall.
What size moving truck do I need.
Does Salvation Army take books?
Daly City Movers
Need Daly City Movers? Moving to a new city is an exciting yet challenging endeavor, and when that city is Daly City, you’re in for a treat. Nestled just south of San Francisco, Daly City offers a unique blend of urban living, scenic beauty, and a thriving community. Whether you’re relocating for work, education, or a change of scenery, having the right moving company by your side can make all the difference. In this blog post, we’ll explore the top 5 movers in Daly City that can help make your transition a seamless one.
The Top 5 Daly City Movers

If you are look for a top moving company in Daly City then you have to check out CareMore Moving and Storage. They are fully licensed and insured and serve the whole Bay Area and California. The specialize in residential and commercial moves and they also offer storage right in the heart of SF. They offer clear upfront pricing and they are never any hidden charges. When you book a move with them you will also receive a confirmation email confirming the dates / times and all pricing so that they is never any confusion. They will also give you a call the day before the move and another when they are on their way on move day. CareMore provide free no obligation quotes which they are able to provide virtually to save you time. Check them out at CareMore Moving or give them a call on 415-822-8547.

One Big Man One Big Truck is one of the top moving companies in Daly City. They cover all of the Bay Area and their website shows their clear and upfront pricing. The specialize in moving apartments and can also offer office moving services. Check them out at OneBigMan or give them a call on 415-821-9697

When looking for top moving companies in Daly City be sure to check out Corrib Moving & Storage. Corrib has experience dealing with moves of all sizes, and they can pack up a large home or a small apartment. This licensed and insured company makes sure that the items that they move are not damaged while being moved. This company can haul a piano from one place to another, and they also take care of other items that are bulky, heavy, and difficult to move. The Corrib Moving & Storage team arrives on time and quickly handles each move they are hired to handle. Visit them at Corrib Moving or give them a call on 415-282-6683

Clutch Moving Company provide free moving quotes and are able to help you 7 days a week. The company provides residential and commercial moving services as well as long distance and staging services. When you book a move with Clutch you are able to review and electronically sign your estimate and you will receive a call ahead of time on move day to let you know they are on their way. Their goal with every move is to move you safely and efficiently, but most importantly have you satisfied with your experience at the end of each move. When look for top moving companies in Daly City be sure to check out Clutch Moving or give them a call on 650-535-2424
Kora moving local moving for both residential and business customers. They also offer piano moving and provide packing and storage services. Kora Moving provides affordably priced services and have a great team of friendly movers. When researching top moving companies in Daly City be sure to check them out at Kora Moving or give them a call on 415-583-1189
In conclusion.
The process of moving to Daly City can be made significantly smoother with the help of reputable and experienced moving companies. The top 5 movers mentioned in this blog post have all earned their place through their dedication to customer satisfaction, attention to detail, and commitment to professionalism. By choosing the right moving partner, you can look forward to a stress-free and successful move to this vibrant and welcoming city.
Suggested posts for you
How to fill nail holes in wall.
What size moving truck do I need.
Does Salvation Army take books?
How To Schedule a Free Furniture Donation Pick up in Dallas
Wondering how to schedule a free furniture donation pick up in Dallas? In the bustling city of Dallas, where kindness meets convenience, the act of donating furniture takes on a whole new level of simplicity. If you find yourself with furniture to spare and a desire to give back to your community, look no further. In this blog post, we’ll introduce you to notable companies in Dallas that offer free furniture donation pickup services, making your altruistic endeavor both effortless and impactful.
1. Goodwill Industries
Website: https://www.goodwill.org/
Overview: Goodwill is a widely recognized nonprofit organization that supports job training and employment opportunities for individuals with barriers to employment. They accept a variety of furniture items in good condition and offer free pickup services across their numerous Dallas locations.
How to Schedule Pickup: Visit their website and navigate to the “Donate Stuff” section. Enter your zip code to find the nearest donation center, and follow the instructions to schedule a free pickup at your convenience.
2. The Salvation Army
Website: https://www.salvationarmyusa.org/
Overview: The Salvation Army is known for its broad range of social services. They accept furniture donations to fund their charitable initiatives, including disaster relief and community support programs.
How to Schedule Pickup: Visit their website and search for the “Donate” section. Find your local Salvation Army location, and use their online scheduling tool to set up a free furniture pickup.
3. Habitat for Humanity ReStores
Website: https://www.habitat.org/restores
Overview: Habitat for Humanity ReStores sell donated items to support their mission of building homes for those in need. Donating furniture to ReStores helps fund affordable housing projects in your community.
How to Schedule Pickup: Visit their website, locate your nearest ReStore, and inquire about their furniture donation pickup services. Contact them via phone or email to schedule your free pickup.
4. Furniture Bank of Metro Dallas
Website: https://www.furniturebankdallas.org/
Overview: The Furniture Bank of Metro Dallas focuses on providing essential furnishings to families transitioning from homelessness to permanent housing. They accept gently used furniture items to furnish the homes of those in need.
How to Schedule Pickup: Visit their website and go to the “Donate Furniture” page. Fill out the online form with details about your furniture items, and the organization will contact you to arrange a free pickup.
5. Dwell with Dignity
Website: https://www.dwellwithdignity.org/
Overview: Dwell with Dignity is a nonprofit organization that empowers families struggling with homelessness and poverty by providing them with well-designed, fully furnished homes.
How to Schedule Pickup: Visit their website and navigate to the “Donate Furniture” section. Fill out the online donation form, and the organization will get in touch to coordinate a free furniture pickup.
Conclusion
In the heart of Dallas, turning generosity into action has never been easier. These remarkable organizations offer free furniture donation pickup services, making it effortless to contribute to causes that uplift your community. By choosing one of these reputable companies, you’re not only simplifying the process but also making a profound impact on the lives of those in need. Let your unwanted furniture find new purpose, and let your generosity shine in the vibrant city of Dallas.
Suggested posts for you
How to fill nail holes in wall.
What size moving truck do I need.
Does Salvation Army take books?
How to start packing for a move
Wondering how to start packing for a move? Moving to a new home is an exciting chapter in life, but the process of packing up your belongings can be overwhelming. With proper planning and organization, you can make the packing process more manageable and even enjoyable. In this guide, we’ll walk you through a step-by-step approach to starting your packing journey for a smooth and stress-free move.
- Create a Packing Timeline
Before you dive into packing, establish a clear timeline. Depending on the size of your home and the amount of stuff you have, start packing well in advance of your moving day. A general rule of thumb is to begin at least 4-6 weeks ahead. This allows you to pack gradually and avoid the last-minute rush.
- Gather Packing Supplies
Collect all the necessary packing supplies to ensure you have everything you need at hand. Essential supplies include:
- Sturdy moving boxes in various sizes
- Bubble wrap and packing paper
- Packing tape and dispenser
- Markers for labeling
- Scissors and box cutters
- Plastic bags for small items
- Blankets or padding for fragile items
- Wardrobe boxes for clothing
- Sort and Declutter
Moving presents a great opportunity to declutter your belongings. Go through each room and decide what you want to keep, donate, sell, or discard. Consider the usefulness and sentimental value of each item. Downsizing before a move can save you time, money, and effort in packing and unpacking.
- Create an Inventory
As you declutter, create an inventory of the items you plan to move. This list will help you keep track of your belongings and assist in the unpacking process. You can use a simple spreadsheet or a dedicated inventory app for this purpose.
- Pack Room by Room
To maintain organization, pack one room at a time. Begin with rooms you use less frequently, such as spare bedrooms or storage spaces. Clearly label each box with the room it belongs to and a brief description of its contents. This will save you time when unpacking in your new home.
- Protect Fragile Items
Wrap delicate items like glassware, ceramics, and electronics with bubble wrap or packing paper. Use blankets or padding for larger fragile items. Fill empty spaces in boxes with packing paper to prevent movement during transit and reduce the risk of breakage.
- Use the Three-Box Method
When packing, employ the three-box method: one box for items to keep, one for items to donate/sell, and one for items to discard. This approach streamlines the sorting process and prevents items from being packed without intention.
- Label Thoughtfully
Labeling is key to a smooth unpacking experience. Clearly mark boxes with their contents and the room they belong to. Additionally, color-coding or numbering boxes can help you easily identify which boxes should be unpacked first in your new home.

- Pack Essentials Separately
Pack a separate box with essential items you’ll need immediately upon moving in. Include items like toiletries, a change of clothes, important documents, and basic kitchen supplies. Keep this box easily accessible.
- Enlist Help
Packing can be a daunting task, so don’t hesitate to ask for help from friends, family, or professional movers. Having extra hands can speed up the process and make it more enjoyable.
Conclusion
Starting the packing process for a move might seem overwhelming, but with a well-structured plan and some organization, you can make the experience smoother and even enjoyable. By creating a packing timeline, gathering the necessary supplies, decluttering, and packing room by room, you’ll be well on your way to a successful move. Remember, the key is to stay organized, prioritize, and keep your end goal in mind: settling into your new home with ease.
Suggested posts for you
How to fill nail holes in wall.
What size moving truck do I need.
Does Salvation Army take books?
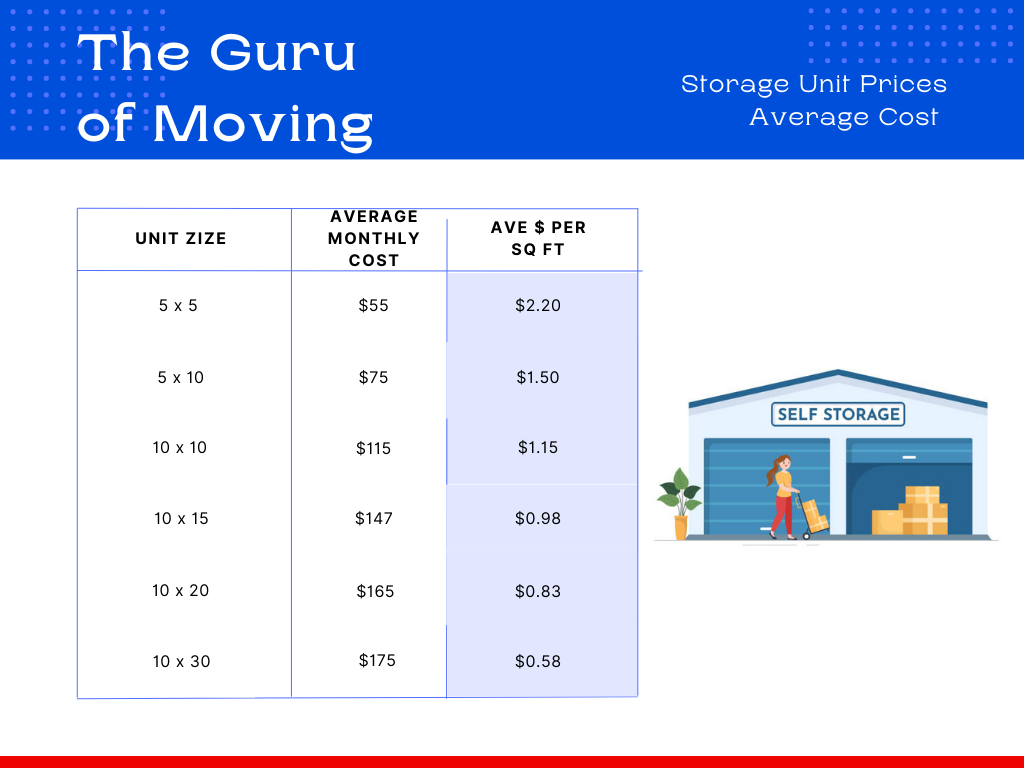
Storage Unit Prices
Storage units have become a crucial asset for individuals and businesses alike. Whether you’re moving, downsizing, or need extra space for your belongings, self-storage facilities offer a convenient solution. However, understanding storage unit prices and finding the best deals can be challenging. In this blog post, we’ll delve into storage unit prices, factors that influence storage unit prices and provide you with valuable tips to save money on your storage needs.
Cost of storage units
According to analysis from move.org who analyzed over 3,500 quotes, the average storage unit cost is approximately $180 per month. Prices from top self-storage companies vary significantly, ranging from approximately $70 to $300 per month, depending on factors such as size, type, and availability. Since storage unit prices are demand-driven, you can potentially save on costs by comparing quotes from multiple storage facilities in your area.
Factors Affecting Storage Unit Prices
- Location: Storage unit prices can vary significantly based on the region or city you’re in. Facilities located in urban areas or areas with high demand often come with higher price tags compared to those in less populated regions.
- Size: One of the most significant factors impacting the cost of a storage unit is its size. Smaller units, such as 5×5 or 5×10, are generally more affordable, while larger units, like 10×20 or 10×30, come with higher monthly rates.
- Type of Unit: Climate-controlled units, which provide temperature and humidity control, are usually more expensive than standard units. The added protection they offer justifies the higher costs, especially if you plan to store delicate or valuable items.
- Amenities and Features: Storage facilities that offer additional amenities like 24/7 access, enhanced security systems, on-site management, and convenient loading areas may have higher rental fees.
- Seasonal Demand: Storage unit prices can fluctuate based on seasonal demand. During peak moving seasons, such as summer when many people relocate, prices may be higher. Conversely, off-peak periods may offer more affordable rates and promotional discounts.

Tips to Save on Self-Storage Costs
- Size Optimization: Evaluate your storage needs carefully and select the smallest unit that can accommodate your belongings. Avoid overpaying for unused space.
- Location Consideration: If feasible, look for storage facilities in less populated or suburban areas, as they may offer more competitive prices.
- Shop Around: Compare quotes from different storage facilities in your area. Online platforms and comparison websites can simplify this process and help you find the best rates.
- Seasonal Discounts: Keep an eye out for special offers and discounts during off-peak periods or seasonal promotions from storage companies.
- Negotiate and Ask for Deals: Don’t hesitate to negotiate the rental price with the storage facility manager, especially if you plan to rent for an extended period.
Conclusion
Storage unit prices can fluctuate based on multiple factors, including location, unit size, amenities, type, and seasonal demand. By considering these factors and employing cost-saving strategies, you can make the most out of your storage solution without breaking the bank. Remember to research thoroughly, read customer reviews, and ask questions before committing to a storage facility. With careful planning and a bit of research, you can find a storage unit that meets your needs and budget, providing you with peace of mind and a clutter-free living or working space.
Suggested posts for you
How to fill nail holes in wall.
What size moving truck do I need.
Does Salvation Army take books?
Moving into a new house checklist
HOW TO FILL NAIL HOLES IN WALL
A Step-by-Step Guide to Fill Nail Holes in Your Walls
Nail holes can be eyesores on otherwise pristine walls, whether left behind from hanging pictures, artwork, or shelving. Fortunately, fixing these small imperfections is a simple and cost-effective DIY task that can make a significant difference in the appearance of your walls. In this blog, we’ll guide you through the process of filling nail holes in your walls, leaving them looking smooth and ready for a fresh coat of paint.
Materials You’ll Need:
All in one hole repair kit


Clean cloth or sponge


Primer and paint (if necessary)
 HOW TO FILL NAIL HOLES IN WALL

Step 1:
Preparing the Surface: Before you begin filling the nail holes, it’s essential to prepare the surface. Remove any dust or debris around the holes by gently wiping the area with a clean cloth or sponge. This ensures a clean and smooth application of the filler.
Step 2:
Filling the Nail Holes: Using your 3 in 1 product. Take a small amount of filler from your tube and generously cover all of your nail holes. Press the filler into the nail holes using the smooth end of the tube ensuring the holes are completely filled. You can slightly overfill the hole to compensate for any shrinkage that might occur as the filler dries.
Step 3:
Smoothing the Surface: Using the same smooth end of your tube, carefully level the surface of the filler, making it flush with the wall. Gently remove any excess filler around the hole. Ensure a smooth finish to reduce the amount of sanding required later.
Step 4:
Allowing the Filler to Dry Allow the filler to dry according to the manufacturer’s instructions. Typically, this can take anywhere from a few minutes to an hour, depending on the product and the depth of the hole. Avoid touching or putting any pressure on the filled area while it dries.
Step 5:
Sanding the Surface. Once the filler has dried completely, lightly sand the area with the sandpaper end of the tube. Sanding helps create a seamless blend between the filled hole and the surrounding wall. Be gentle and use light, circular motions.
Step 6:
Wipe and Clean After sanding, wipe away any dust or debris with a clean cloth or sponge. This step ensures a clean surface for painting or applying touch-up paint.
Step 7:
Priming and Painting (if necessary) If you’re happy with the repaired nail holes and the wall is already painted, you may not need to do this step. However, if you’ve recently painted your walls or if there are touch-up areas, consider applying a primer before repainting the entire wall to ensure a consistent finish.
Conclusion:
Filling nail holes in your walls is a straightforward DIY task that can make a big difference in the overall appearance of your living space. With the right materials and a little patience, you can easily achieve a smooth and seamless finish. Taking the time to address these minor imperfections not only enhances the aesthetics of your home but also prevents potential wall damage in the long run. So, roll up your sleeves, grab your tools, and let’s start repairing those nail holes!
Other Top Posts
Home Security Tips for a New Home
Moving out for the first time is an exhilarating milestone that marks a new chapter in your life. It’s a step towards independence, self-discovery, and personal growth. However, it can also be a bit overwhelming if you’re not adequately prepared. Don’t worry, though! In this guide, we’ll walk you through essential tips to help you navigate this exciting journey with confidence and ease.
1. Budgeting:
One of the first things to do when planning to move out is to create a realistic budget. Take stock of your income and calculate your monthly expenses. Be sure to include rent, utilities, groceries, transportation, and other essentials. By having a clear budget, you can manage your finances effectively and avoid any unnecessary stress.
2. Finding a Place:
Finding the perfect place to call home requires careful consideration. Look for rental properties within your budget and in safe, convenient locations. Consider factors like proximity to your workplace or educational institution, access to public transportation, and nearby amenities. Take your time to research and visit potential places before making a decision.
3. Roommates:
Living with roommates can help alleviate some financial burden and provide companionship. However, it’s crucial to choose your roommates wisely. Look for individuals who share similar lifestyles and have compatible habits. Establish clear communication and discuss expectations regarding shared responsibilities, such as cleaning, paying bills, and respecting each other’s personal space.
4. Furniture and Essentials:
Equipping your new space with essential items can be both exciting and costly. Prioritize the necessities, such as a bed, table, chairs, kitchen utensils, and basic appliances. Consider buying second-hand furniture or exploring local thrift stores to save money. Remember, it’s okay to start with the essentials and gradually acquire additional items as you settle in.
5. Set up Utilities:
Contact utility companies in advance to ensure a seamless transition when you move in. Arrange for services like electricity, water, internet, and cable to be connected before your move-in date. Keep track of the associated costs and include them in your budget.
6. Packing and Organizing:
Start packing early to avoid any last-minute rush. Label your boxes to make unpacking easier. Consider creating an inventory list to keep track of your belongings. This will also come in handy when purchasing renter’s insurance or making a claim in case of loss or damage.
7. Change of Address:
Notify important parties about your address change to ensure a smooth transition. Inform the post office, your employer, banks, subscriptions, and any relevant government agencies. Update your address on important documents like your driver’s license and ID.
8. Renter’s Insurance:
Protecting your belongings is crucial, especially when you’re living on your own. Renter’s insurance provides coverage for theft, damage, or accidents. Research and compare different policies to find one that suits your needs and budget. You can use a company like Lemonade. Or check our consumers advocate for a list of the top renters insurance.
9. Move-in Inspection:
Before settling into your new place, thoroughly inspect the property for any existing damages or issues. Take photos or videos as evidence and share them with your landlord or property manager. This will help prevent any disputes when it’s time to move out.
10. Household Responsibilities:
If you’re living with roommates, it’s essential to establish clear guidelines and expectations regarding household responsibilities. Discuss chores, cleaning schedules, and shared expenses upfront. Open communication and mutual respect are key to maintaining a harmonious living environment.
11. Safety Measures:
Prioritize your safety by familiarizing yourself with the safety features in your new home. Locate fire extinguishers, smoke detectors, and emergency exits. Take precautions to ensure the security of your belongings and personal well-being.
12. Socialize and Explore:
Moving to a new place offers opportunities for personal growth and building connections. Take the initiative to meet your neighbors and explore your new neighborhood. Engage in local activities, join community groups, or attend events to expand your social circle and feel more at home.
Checklist of Things to Buy Before the Move:
-
Bedding:
- Mattress
- Pillows
- Mattress topper
- Bedsheets
- Duvet
- Blankets
-
Curtains:
- Curtains for privacy and soundproofing
- Curtain rods or rails
-
Cleaning Supplies:
- Vacuum cleaner or broom
- Dustpan and brush
- Microfiber cloths
- All-purpose cleaner or antibacterial spray
- Window cleaner
- Toilet cleaner and brush
- Bin liners
- Toilet paper
- Rubber gloves
-
Kitchen Basics:
- Plates, bowls, and cutlery
- Drinking glasses and mugs
- Pots and pans
- Cooking utensils (spatula, whisk, ladle, etc.)
- Kitchen knives
- Can opener
- Food storage containers
- Dish drying rack or drainer
- Oven mitts or kitchen gloves
- Basic pantry staples (snacks, coffee, tea, etc.)
- Groceries for immediate consumption
-
Electrics:
- Batteries (various sizes)
- Extension cords or power strips
- Chargers for electronics (phones, laptops, etc.)
- Light bulbs
-
Toolkit:
- Hammer
- Screwdrivers (Phillips and flathead)
- Pliers
- Measuring tape
- Level
- Nails, screws, and wall hooks
- Allen wrench set
- Duct tape
- Scissors
-
First Aid Kit:
- Painkillers (such as acetaminophen or ibuprofen)
- Adhesive bandages (various sizes)
- Antiseptic ointment or cream
- Tweezers
- Disposable gloves
- Thermometer
- Antacids or stomach relief medication (optional)
Remember to add any additional items specific to your needs or preferences to this checklist. Moving out for the first time can be overwhelming, but with careful planning and preparation, you’ll have everything you need for a comfortable and smooth transition into your new home. Enjoy this exciting new chapter in your life!
Other Top Posts
Items GoodWill can accept
Goodwill happily accepts the following new or gently used items:
- Vehicles—We accept donations of vehicles in all conditions. Learn more and fill out a vehicle donation form on our Vehicle Donation Page to get started.
- Clothing, shoes and boots
- Jewelry
- Hats, gloves, mittens, and scarves
- Books, records, CDs, videotapes, and DVDs
- Games, toys, and sports equipment
- Housewares: dishes, glassware, kitchen utensils, lamps, and small appliances
- Collectibles, antiques, knickknacks, and other giftware
- Hand tools and small power tools
- Domestics: linens, curtains, blankets, etc.
- Electronics including but not limited to:
- CPUs
- Flat-screen monitors (no CRTs)
- Hard drives
- Laptops
- Cell phones
- VCRs
- DVD players
- TVs working flat screen (no CRTs)
To help you determine your donations fair market value Goodwill is happy to provide a “Value Guide” that offers average prices in our stores for items in good condition.
Items GoodWill can not accept
They CANNOT accept the following items:
- Furniture
- Chairs, stools, or couches
- Mattresses and bed frames
- Desks or other office furniture
- Tables of any kind
- Dressers, bookcases, entertainment centers, etc.
- Large exercise equipment
- Pianos or organs
- CRT TVs
- CRT Computer Monitors
- Household chemical products such as pesticides, paint, paint thinner, drain cleaner, oven cleaner, aerosols, and other environmentally unfriendly waste products.
- Automotive hazardous waste such as tires, lead-acid batteries, additives, gasoline, oils, antifreeze, etc.
- Large appliances such as refrigerators, freezers, stoves/ovens, washers/dryers, air conditioners, dehumidifiers, furnaces, trash compactors, water heaters, large console stereos, freon-based appliances, etc.
- Personal care items such as shampoo, conditioner, nail polish remover, shaving cream, hairsprays, or shavers
- Fragrance items
- Carpet or carpet padding
- Plumbing fixtures or building materials
- Traditional recyclables such as glass, newsprint, office paper, cardboard, plastics, magazines, junk mail, etc.
- Weapons such as guns, bows and arrows, ammunition, etc.
- Cribs, car seats, walkers or other products that do not meet the current safety standards of the US Consumer Product Safety Commission, including recalled items.

If you would like other place to donate your books to also check out our post on Where to donate books when moving.
Salvation Army Accepted Items
Items Salvation Army does not Accept
BUILDING MATERIALS/FIXTURES
Air Conditioners
Blinds all types
Building supplies of ANY type
Built-In Appliances
Carpet or Padding
Counter Tops
Curtain rods, Drapery Rods, Drapes
Doors & Door Frames
Fencing (all kinds), include barbed wire
Furnaces/Wall Heaters
Garbage Disposals
Hide-A-Beds
Jacuzzis/Hot Tubs
Plumbing Fixtures: Sinks, Toilets, Bathtubs, Shower doors
Sofas (sectionals)
Water Heaters or softeners
HAZARDOUS or SAFETY ISSUES
Batteries / Car Parts including tires and wheels
Guns, Firearms, and Ammunition
Hazardous Materials of ANY type
Insecticides, Paint or other toxic materials
Propane Tanks
Refrigerators due to freon
Baby items such as: Cribs, car seats, strollers, rockers, playpens.
Medical equipment such as walkers, wheelchairs, canes, crutches, etc.
Medical supplies such as hand sanitizer, masks, etc.
LARGE OR BULKY ITEMS
Entertainment Centers
Hospital Beds
Mattresses (spring or memory foam)
Office cubicles
Office Machines, Copiers
Satellite Dishes
Swing Sets or Playground Equipment
Waterbeds